
Input, on the face, seems pretty boring. “What happens when the player hits the spacebar?” seems like a pretty easy question to answer and a pretty simple thing to implement.
And in some cases it is. But think for a second about a modern game. What’s the answer? Maybe, in a platformer, the character jumps. But does the character always jump? What about when the game is paused? What if spacebar means “jump” most of the time, but if the character is standing next to a gun, she picks it up? What if you give the player the ability to re-map buttons, so that spacebar could mean jump, run, or quicksave? What if you support a gamepad, so there’s no spacebar any more?
These intersecting questions pile on the complexity, and in fact in Gone Home (which doesn’t even have jumping) the input system is the single most complex system I wrote. Of course, Gone Home doesn’t have a lot of complex AI code or gameplay interactions, but even in a more traditional title input is something that, done right, represents a lot of complex choices and abstractions. Gone Home does support a wide range of input features, though, such as choosing between mouse/keyboard and gamepad, remapping keys, and a number of behind-the-scenes features that make for a smooth experience.

A selection of input contexts. Clockwise from top left: Default, Examine, Journal, Map
The first question I considered is “How do we handle the same button doing different things?” This may seem like an uncommon situation, but, for example, most of the time in Gone Home pressing the left mouse button does nothing. When the player has moused over an interactive object, however, it triggers the interaction (or “frobs” the object, http://en.wiktionary.org/wiki/frob). So that’s two states that need to be accounted for. Plus if the game is paused, we don’t want to frob things, if we’re holding an object we want to let go of it, and so on. The response to pressing the left mouse button depends on the context.
And so the first abstraction our input system uses is “input contexts”. We always have a current InputContext that the player is in, that defines a number of things about how input works while that context is active. It lists the commands available to the player, as well as things like whether the mouse cursor is visible, whether the simulation is paused, whether this context changes the player’s mouse sensitivity or FOV, and a lot of other useful information. Some InputContexts only allow the player access to the commands they explicitly provide, where others are additive on top of whatever other contexts are active. So, for example, the “Crouched” InputContext only adds the ability to Uncrouch on top of everything else the player can do, while the “Main menu” InputContext drastically limits the available actions. We keep a list of all the active InputContexts in the order they were applied. For the most part, this conforms to the classic definition of a stack, and it was originally implemented that way, but occasionally we want to remove an element that is not the top of the stack.

What an input context looks like in the Unity Inspector
In addition to InputContexts, there are a few other abstractions that the system uses: Controls and Commands. (Contexts, Controls, and Commands – this is really confusing naming and I wish I had done a better job. Don’t do this.) A Control represents the action the player is trying to perform. For instance, in the default context there’s a Control “crouch”. Controls also track whether they can be remapped by the player, the desired key state for triggering, and whether the control is exclusive to its current context.
A Command is a way to represent the actual code that is executed when the Control is triggered. It takes the form of a callback to some function. In the case of “crouch” we have a CrouchManager component on the player object that tracks crouching state and interpolates camera position. The Control and Command are decoupled because, based on context or other changes in game state, we might want to respond differently to the same Control.
Those abstractions explain how we deal with the player attempting to frob objects when the game is paused, or how we might change the crouch button to stand up when the player is already crouched. In order to answer the questions of how the game deals with remapping buttons, though, there are yet more abstractions!
A KeyMapping is a simple mapping of a key code (what Unity reports when the player hits a key) to a Control. Whenever the player chooses to remap an input, we change the key code associated with that Control. Unity already has an InputManager that tracks this, but it’s not possible to change anything about it while the game is running, sadly. In order to avoid having to quit the game to remap keys, I had to write my own solution. Hopefully in the future Unity will correct this oversight. Hey Unity, feel free to use this blogpost as inspiration!
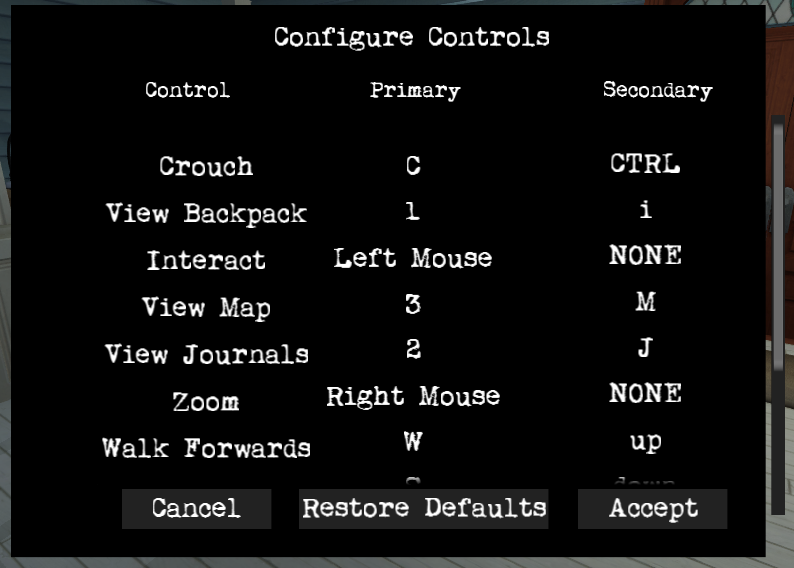
The control binding screen (Not final UI)
The last piece of the puzzle is dealing with a different sort of input entirely, such as a gamepad. Instead of pressing “c” to crouch, we want to be able to click the left stick, and instead of clicking the mouse button to interact, we want to be able to press the big green A button. Which sounds an awful lot like remapping controls! Except it’s every control, and we want to be able to switch back and forth at will. Gone Home deals with this by having a pre-set group of KeyMappings that we switch in and out on demand, called a ControlScheme. We keep at least four versions of this: the defaults for keyboard/mouse and gamepad, as well as user-remapped versions of each (we don’t want to lose your custom keybindings if you try the gamepad!). Because we want these bindings to last between play sessions, we save these out to disk in files. That means that switching between keyboard and gamepad, or reloading the default keybindings, is as simple as deserializing a file.
We do a couple of other things to make working with gamepads easier. The first is a system for translating analog inputs, such as from the joysticks or triggers, into regular discrete button presses. We don’t always want this; for things like movement analog inputs are preferred, but for some features we only care if an input has occurred at all. We also have a system for automatically replacing button references in our UI text, so that no matter what key or button an action is mapped to, the game will correctly display “Press <whatever> to crouch”.
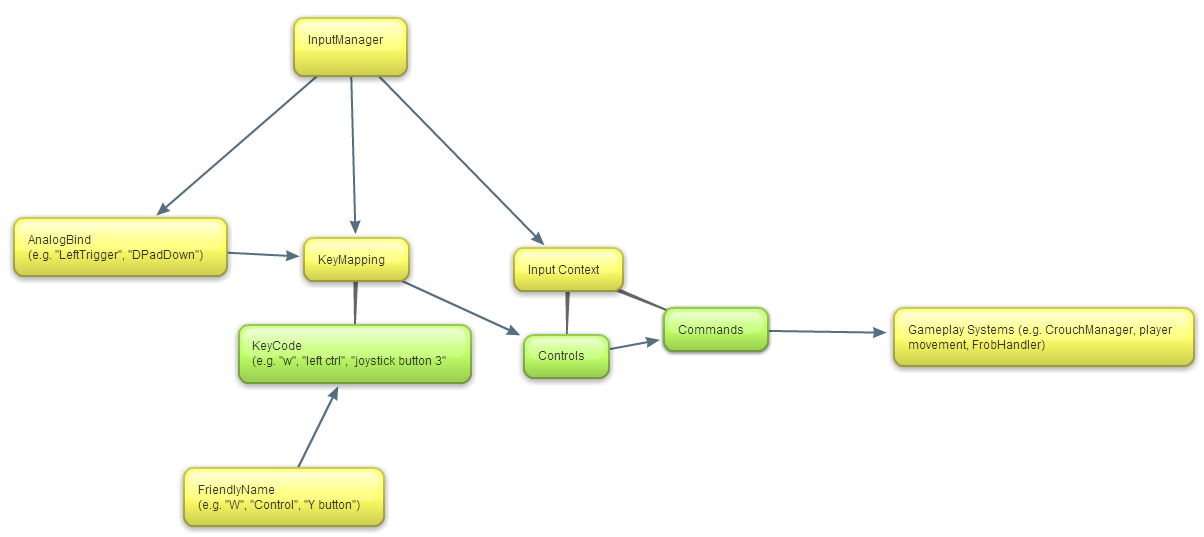
Diagram of the relation between various input systems
So to show how all these pieces fit together, here’s the basic flow of the main Update function of the InputHandler:
First we test the analog key bindings:
        foreach (AnalogKeyBinding KeyBind in AnalogBinds)
        {
            float AxisValue = Input.GetAxis(KeyBind.AxisName);
            AxisValue = KeyBind.PositiveAxis ? AxisValue : -AxisValue;
            if (AxisValue > KeyBind.ButtonThreshold && KeyBind.LastFrameValue <= KeyBind.ButtonThreshold)
            {
                KeyBind.ButtonDown = true;
            }
            else if (KeyBind.LastFrameValue >= KeyBind.ButtonThreshold && AxisValue < KeyBind.ButtonThreshold)
            {
                KeyBind.ButtonUp = true;
            }
            KeyBind.LastFrameValue = AxisValue;

        }
Then we iterate through our InputContexts, testing each Control it contains against the state of the key it’s currently mapped to. If the state matches the activation state, we trigger the callback of the associated Command.
        foreach (InputContext context in ContextStack)
        {
            int i = 0;
            bool ShouldBreak = false;
            foreach (InputContext.Control control in context.Controls)
            {
                if ((control.DesiredState == InputContext.KeyState.DOWN && ControlDown(control.ControlName))
                    || (control.DesiredState == InputContext.KeyState.UP && ControlUp(control.ControlName)))
                {
                    if (CommandCallbackMap.ContainsKey(context.Commands[i]))
                    {
                        CommandCallbackMap[context.Commands[i]]();
                        if (control.Exclusive)
                        {
                            ShouldBreak = true;
                            break;
                        }
                    }
                    //Tell uScript about it
                    SendMessage("OnCommandIssued", control.ControlName, SendMessageOptions.DontRequireReceiver);
                }
                else if(control.DesiredState == InputContext.KeyState.AXIS)
                {
                    float AxisValue = 0.0f;
                    if (control.Raw)
                    {
                        AxisValue = Input.GetAxisRaw(control.ControlName);
                    }
                    else
                    {
                        AxisValue = Input.GetAxis(control.ControlName);
                    }

                    if (control.Raw || Mathf.Abs(AxisValue) >= AxisThreshold)
                    {
                        if (AxisCommandCallbackMap.ContainsKey(context.Commands[i]))
                        {
                            AxisCommandCallbackMap[context.Commands[i]](AxisValue);
                            if (control.Exclusive)
                            {
                                ShouldBreak = true;
                                break;
                            }
                        }
                        //Tell uScript about it
                        SendMessage("OnCommandIssued", control.ControlName, SendMessageOptions.DontRequireReceiver);
                    }
                }
The rest of the work in the InputHandler is all of the support functions for this loop, as well as the functions needed to deal with key remapping.
This system, while complicated, allows Gone Home to have a robust, powerful, and flexible system for user input that can handle almost any situation we want to create for the player with minimal work on the content side. Because of it we’ll be able to support an arbitrary number of control schemes, full control remapping on both mouse/keyboard and gamepad, and offer a smooth painless experience for interacting with the game.

I love these glances into the programming behind Gone Home, they make me feel like I’m learning something.
Oculus Rift would be the ultimate input system for this game! Pleeeeeeease tell us you’re at least considering it.